Module 5 "Touching Texture"

Module 5: "Touching Texture"

A study based on textured surfaces in landscape.

Sunday, 6 October 2013

Certificate Module 3 Chapters 3 and 4: a bit more dyeing and a bit more stitching


I wish I could say I have finished Chapter 4, but illness (in relatives and myself), home refurbishment, visiting lots of artists' studios during the three weeks of North East Open Studios and resting to recover from all of the above has meant that I haven't had much time to spare.  I was horrified to realise that my last post was in August and it's now October.

I haven't been entirely idle in terms of Distant Stitch work, but I've been working a bit piecemeal, a bit of this, a bit of that.

However, I felt I needed to get into the habit of posting on my blog again, so here is what I've done so far.

I have already posted some hand stitching that I did, but I've added more stitching to some samples so will include them again in this post.


Colouring Fabric

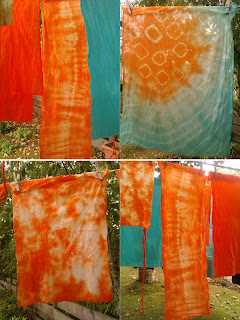
I was beginning to run out of coloured fabric and so had another go at that.  Last time I saved time by using fabric paint and acrylics mixed with fabric medium, but I thought I'd like to revisit some shibori from Module 2.   I used Dylon cold water dyes in sea blue and goldfish orange and a mixture of muslin, plain white cotton, calico and felt.


3.3.d1 the fabric prepared for dyeing

3.3.d2: the blue dyebath


3.3.d3: the orange fabrics rinsed


3.3.d4 some of the results drying on the line
After doing some shibori in Module 2, I felt more confident this time of being able to exert a certain amount of control over where the colours went and I was quite pleased with the results.


Stitching on fabric

I have really enjoyed the hand-stitching.  Armed with Mary Thomas's Dictionary of Embroidery Stitches I spent some blissful hours (on the comfortable sofa in my newly refurbished studio!) enjoying the meditative rhythm of hand sewing.


3.4.h1
The colours in 3.4.h1 are slightly off my chosen colour scheme, but this sample was begun at a class where I didn't expect to be able to work to my Distant Stitch scheme and I didn't have the right colours with me.  However, I do like it.  Sheer polyester with little beads in it was Bondawebbed to an aubergine coloured polyester fabric, trapping circles, spirals and snippets of fabric and thread.  Stitching was done on top to follow the shapes underneath.

3.4.h2
 
3.4.h2 was just the enjoyment of pure stitch on dyed muslin.  It was fun choosing linear stitches which would easily follow a curve.


3.4.h3

I had a fragment of fabric, left over from Summer School, which I had monoprinted and didn't much like as I thought the grid was too regimented.  I had attempted to make it more interesting by printing spirals with a print block, echoing the grid idea, but with the curve of the spirals to soften it.  I used a different stitch for each spiral so making it less symmetrical.  Again this was most enjoyable to do.

3.4.m1
I've only just begun on the machine stitched samples.  In 3.4.m1 I have piled on spiral upon spiral, using a variegated thread.  I quite like the effect of it.  In 3.4.m2 I have gone to the opposite extreme and produced a minimalist piece.  My husband received a bouquet of flowers on his birthday from a family friend and these petals fell off.  I liked how they looked and so trapped them between two sheets of Bondaweb onto blue muslin and then worked the simplest spiral of orange thread on each petal.


Playing with spirals

A bit of fun.  I printed some spiral digital artwork onto Tyvek and cut out some spiral shapes before ironing them between sheets of baking parchment.  The pieces resulting reminded me of some strange sea creatures and so I stitched them onto blue cotton.  I wanted some of them to be concave rather than convex and so coloured the white side with acrylic paints.  I am considering whether I should leave this piece like that or stitch on some wave shapes, either by hand or machine, around the creatures.
3.4.p1

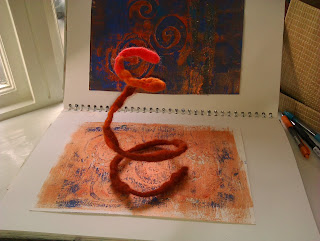
Inspired by Sian's Murmurations piece and by a new book I bought, "500 Felt Objects", I covered some wire with fleece and wet felted it before bending it into a spiral shape.  It can be bent into any shape and this might be the germ of an idea for later in this Module.


Thursday, 22 August 2013

Studio Makeover (and a little bit of Module 3 Chapter 4)

Since swapping my studio with the spare bedroom, I’ve found there is not nearly enough storage.  Trying to plan how to improve it gave me the chance to re-think the whole room, what I wanted to keep there and what I wanted to do there.
Functions I want in my studio:
  • space for art, fabric painting, dyeing
  • space for hand and machine sewing as well as storage for fabric, thread, Bondaweb and other “special effect” products
  • space for writing letters, paying bills and other paperwork
  • computer, printer and associated storage for CDs, printer ink and paper etc.
  • a comfortable sanctuary to read and listen to music
  • occasional use as a second spare bedroom
  • storage for books
  • storage for knitting yarns and patterns
A lot to ask of a space which is only 2.7m by 2.7 m!!
After a lot of thought here is the plan I came up with:
plan for desks and storage


east wall elevation
north wall elevation
south wall elevation

I contacted my joiner and showed him my plans.  The next step was to empty the room.  The contents filled every free space in every other room in the house!  Finally however, it was done:
studio emptied
Today, the joiner finished installing all the shelves:
shelves in place
We’ve had a quick trip into town to get paint and so tomorrow I’ll start painting it.  I was tempted to be lazy and get the painter to do the job, but he is tied up for the next couple of weeks with a really big job and I don’t have the patience to wait that long.  The painter recommended using emulsion paint as a primer for the bare mdf before painting it.  A useful tip.  I chose Crown Milk White for both walls and paintwork, a gentler, warmer white than Brilliant White, especially since the room is north facing and rather dark.   Can’t wait for tomorrow to see it all nice and bright and white.

Finally, here is a picture of the sofa bed I'm intending to buy.  Reviews are very good, getting 4 and a half stars out of a possible 5 with 27 reviews.  It's also simple, stylish and reasonably priced.


Luckily this has come at a time when my current Distant Stitch work is hand stitched spirals, so my studio can (temporarily) be in a small plastic box that I can carry around.  Here’s what I’ve done so far.
IMAG1135
3.4.h1

IMAG1131
3.4.h1 detail a

IMAG1132
3.4.h1 detail b

IMAG1133
3.4.h1 detail c

IMAG1134
3.4.h1 detail d

IMAG1136
3.4.h2

IMAG1138
3.4.h2 detail a

IMAG1139
3.4.h2 detail b

IMAG1140
3.4.h2 detail c

I am really enjoying the hand stitching (and revisiting Mary Thomas dictionary of stitches) – an oasis of calm while chaos has been happening in the house around me.  The upheaval will be worth it though.

Sunday, 21 July 2013

Certificate Module 3 - a bit more to add to Chapter 2 and a start on Chapter 3

Chapter 2 


I received as a birthday present a wonderful book, Collage, Stitch, Print by Val Holmes (Batsford 2012, ISBN 978 1 84994 014 6) which inspired me to give the technique a try.  It would take many months to fully experiment with all the ideas in the book, but I thought the relief in some of my collages for Chapter 2 might be deep enough to make a collagraph plate.  I sealed the surface with pva and rolled acrylic paint on with a brayer.  I mixed various combinations of my chosen colour scheme and produced a series of prints as shown below.

3.2.c1

3.2.c2
 

3.2.c3
 

3.2.c4
 

3.2.c5
 

3.2.c6
 
 Below is a photograph of the plate used after making the prints.  It makes an interesting example on its own.
3.2.c7
 
I was so pleased with this technique that I tried the same method with another collage I had made.
3.2.c8
 

3.2.c9
 

3.2.c10
 

3.2.c11 the plate after the prints had been made
 

3.2.c12
 
I was doing these prints literally as I was packing the materials I needed for Summer School.  I took them with me to show Sian, but hadn't time until now to post them on my blog.  I look forward to exploring this technique further, in particular, using stitch to make texture on the plate, as demonstrated by Val Holmes in her book.


Chapter 3

Here is work that I have done since coming home from Summer School.  I began on Chapter 3 of Module 3 by colouring some fabrics.  I used fabric paints (Dye-na-Flow) and acrylic paint mixed with fabric medium.  This gave good results, much quicker and easier than using dye.  I intend to re-visit this exercise in the future, since I had only a limited range of fabrics at home and because I'd like to try again some of the shibori techniques from Module 2.  However, my fingers are itching to get stitching so I went for speedy results.  Here are my coloured fabrics, hanging on the line to dry and then dried, ironed and folded.


To add to them, I had some shibori fabrics left over from Module 2 as well as dyed and printed fabrics from other projects.  I also bought some dyed fabric while in Malvern on holiday from a lovely shop called Stitch 45. 

Someone mentioned at Summer School that if you mix fabric paint with aloe vera gel then it does not spread on fabric and you get a clean line.  I tried it with Dye-na-Flow on a sheer, metallic polyester with quite pleasing results.
3.3.aloe 1
 

3.3.aloe 2


I am becoming hooked on monoprinting.  I love it.  I had fun monoprinting some of my fabrics.

3.3.m1 on a left over piece of printed fabric
 

3.3.m2 on acrylic felt

3.3.m3 on acrylic felt

3.3.m4 on polyester sheer metallic fabric
 

3.3.m5 on polyester sheer
 

3.3.m6 on dyed cheesecloth
 

3.3.m7 on cotton muslin

I also had some fabrics I had printed at Summer School with Sue Dove.
3.3.m8 on previously shibori dyed and block printed cotton
 

3.3.m9 on a digital print on cotton that didn't work out.  It does now I think.

 
 Three of the summer school monoprints were a bit pale, being on plain white cotton and so I mixed up some dilute acrylic paint with fabric medium and brushed it over the monoprint.  It worked well, the print easily showing up through the transparent wash.
3.3.m10 on cotton
3.3.m11 on cotton

3.3.m12 on cotton


What a wonderfully rich creative time I am having.  More riches to look forward to with a two-day workshop with Alison King on Tuesday and Wednesday of this week.  My cup runneth over.