Module 5 "Touching Texture"

Module 5: "Touching Texture"

A study based on textured surfaces in landscape.

Saturday 5 November 2016

Certificate Module 4 Chapter 11 ... one more step ...

I have come to enjoy the quiet stitching of my fishing net.  Since deciding to try to spend half an hour each day on this task, it has become an oasis of peace and quiet in my busy life - something to anticipate with pleasure rather than  a chore.

Alternating the stitching with more creative work has also proved a successful way of working, bringing variety to my Distant Stitch work.

I have now finished the fishing net, strengthening the edges with a narrow, close machine zigzag stitch.  I am pleased with how it has turned out: soft and light and it drapes very well.

4.11.FS 5 - completed net

Alongside the stitching, I have also been working on how to compose the piece.  The net on its own will not be strong enough to support the weight of the four little books.  Inspired by a little sketchbook I had made earlier in this module, I decided that it needed a firm background on which to fix the net.


4.11.FS 6 small sketchbook

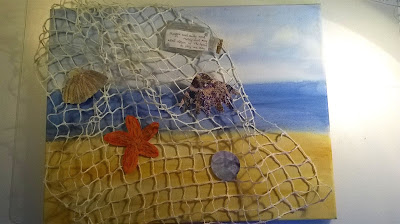
 I had a canvas, 45cm by 35cm and thought I would try this.  I painted it in bands of colour to represent sky, sea and sand.

4.11.FS 7 painted canvas

Sian had suggested that I try mock-ups of the books to decide on the best size.  I coloured pieces of paper to represent each book and used plastic coloured with oil pastels for a mock up of a message in a bottle for the first verse of the poem.

I laid the whole thing out flat on a table and photographed it from above to give myself an idea of how the completed piece might look.  When I found an arrangement I liked, I photographed it.  I have not yet decided how to display the last line of the poem "for whatever we lose like a you or a me it's always ourselves we find in the sea".  One idea would be to make a piece of seaweed from fabric and stitch the words onto that.

4.11.FS 8 suggested layout

My task now is to make the little books.  My feeling at the moment is that little concertina books might work.  I have not yet decided whether all the books will be the same type of if they will all be different.  I have many decisions and experiments ahead of me, which I anticipate with pleasure.

Tuesday 25 October 2016

Certificate Module 4 Chapter 11 continued ...

It is three months since I last posted on my blog, so I feel it necessary to recap.

I came back from Summer School in July all fired up and keen to proceed with the final push of this Module.  My best of intentions were derailed by helping two lots of friends pack up and move house, a succession of minor assorted bugs and viruses, major house refurbishment, visitors and more illness.  I completely lost my direction, enthusiasm and energy.

However I'm now fit as a flea and my get-up-and-go seems to have crept back home.   My former studio is now a downstairs bedroom all ready for a disabled guest who is coming to stay for a few days, as well as (hopefully not too much later) for Moray when he has the hip replacement surgery that his doctor says is necessary.  One of the upstairs bedrooms is now my new studio with a pleasant view of the garden and thanks to IKEA, plenty of storage and work areas.  I'm now back in harness and ready to proceed.

Former bedroom, now studio

Former studio, now bedroom
To recap, I am interpreting a poem by ee cumming:

'maggy and milly and molly and may'
maggy and milly and molly and may
went down to the beach(to play one day)

and maggie discovered a shell that sang
so sweetly she couldn't remember her troubles,and

milly befriended a stranded star
whose rays five languid fingers were;

and molly was chased by a horrible thing
which raced sideways while blowing bubbles:and

may came home with a smooth round stone
as small as a world and as large as alone.

For whatever we lose (like a you or a me)
its always ourselves we find in the sea


e e cummings

My plan is to make a book for each of the four girls, shaped as the object each one found on the beach.  The books will be caught in a fishing net, with the first and last verses as messages in bottles, also caught in the net.

4.11.FS 1
My first task was to decide how to make the net.  I thought of four different methods I could use to make the net:

(1)  Russian Drawn Thread Ground, where threads are withdrawn and the remaining bars overcast.  This could be worked in a very open fashion.

Mary Thomas's Embroidery Book

(2)  Using the technique of "gloop" from summer school.  A mixture of PVA and cellulose would be painted onto a black bin liner and then threads and pieces of fabric could be laid on the gloopy surface with more gloop added.  Once dry, the adhesive would have fixed the threads in place and the whole network could be peeled off the black plastic.
4.11.FS 2 An example of a gloop structure now applied to a painted background
(3)  Crocheting a mesh using thin string and a large crochet hook to make a very open structure.

(4)  Researching and trying genuine netmaking techniques.


The first one I tried was the Russian Drawn Thread Ground.  I first bleached a piece of window-cleaning scrim then withdrew threads - withdrawing 16 and leaving 4 each time.  I then used the withdrawn threads to overcast the bars.  I was so delighted with the appearance and fragility of the resulting structure that I decided to settle for that method instead of trying the others.  As well as being satisfying because it used the techniques covered in this module, the delicacy and fragility seemed to me to echo the  emotional state of the girls in the poem.

4.11.FS 3 fishing net


I'm currently still working on the fishing net as it is time-consuming work.  To save getting too bored and risking getting bogged down again, I've decided to spend half an hour every day stitching at the net until it is finished.  (It's more than half-way now!)  In the meantime I'll also work in parallel on something more exciting.

Today I started working on ideas for the covers of the four books.  I started with May's book " a smooth round stone as small as a world and as large as alone".  Today I painted some paper in stone type colours, using some metallic paint and irridescent medium.  I hope to make 3-D covers for front and back by layering successively small round pieces to build up a dome shape to represent the stone.

4.11.FS 4 stone coloured papers

I have been worrying a lot about losing track while being unable to do anything about it.  It is good at last to have the time, a space to work and most of all, my energy and enthusiasm back.

Monday 18 July 2016

Certificate Module 4 Chapter 11 - a little bit more

I've been giving some more thought to my special book structure and thought I'd just record my ideas so far.  I still have some book structures to try from the Chapter 10 course notes and a few I've seen on the internet.  I'll try to make the content of these samples relevant to my ideas for interpreting ee cummings' poem "maggy and milly and molly and may".

I have three main areas to focus on for my work now:

  • explore some more book structures and, from my samples, select ones suitable for interpreting the poem
  • decide on the content of each girl's book
  • devise a method of linking the books that contributes to the theme

I've come up with three main ideas, which I've scribbled down in my notebook:

4.11. idea 1

4.11. idea 2

4.11. idea 3


Sorry about the untidy and scrappy writing and sketches!  At the moment I'm liking idea 2 best, I see the net as being suspended with each book clipped on so that it can be removed to read.  The first two lines, "maggy and milly and molly and may went down to the beach (to play one day)" and "For whatever we lose (like a you or a me) it's always ourselves we find in the sea" would each be written on a piece of paper inside a bottle, while each girl's book would contain her part of the poem along with stitching inspired by it.  I like the idea of shaped books, possibly concertina style like the little rows of paper dolls that little girls used to play with.

4.11. concertina stars


I feel happy and excited that I can see my way forward and know what I need to do next, yet have enough leeway to change my route if the work brings new ideas.  

Friday 15 July 2016

Certificate Module 4 Chapter 11 "Make a Special Book Structure Related to Media" - first thoughts

In choosing my colour scheme based on objects I picked up while beachcombing on a family picnic, the beach and the sea seems to have crept in quite unintentionally to all my work.


 It reminded me of a poem I often used to read to my Primary 6 and 7 pupils when I was a teacher.


'maggy and milly and molly and may'
maggy and milly and molly and may
went down to the beach (to play one day)

and maggie discovered a shell that sang
so sweetly she couldn't remember her troubles, and

milly befriended a stranded star
whose rays five languid fingers were;

and molly was chased by a horrible thing
which raced sideways while blowing bubbles: and

may came home with a smooth round stone
as small as a world and as large as alone.

For whatever we lose (like a you or a me)
it's always ourselves we find in the sea

e e cummings

When thinking about what I wanted to do for my special book structure, I thought I'd like to try to interpret e e cummings'  poem.  (He had his own eccentric approach to punctuation.)  The poem makes us think of the character of each girl and how her character influences how she reacts to the objects on the beach.  I thought it would be interesting to make a book to represent each girl and the object she found.   I had a very exciting tutorial with Sian at the Summer School when we had a real brainstorming session, discussing how I could portray each girl and how I could present the books in a way that would link them.

Since coming home, I've been thinking of how I could do this and how I could also incorporate some of the exciting new techniques we learned about at Summer School.

I was afraid I might forget about some of the ideas and so I started by having a brainstorming session, taking a sheet of paper for each girl and writing down words and ideas that came into my mind when I considered her part of the poem.


maggy


milly


molly


may
I'm feeling quite excited about this project and looking forward to exploring each book and how to link them.

I've been playing around with portraying each object through embroidery, at the moment quite literal interpretations, but some of my brainstorming inspires me to try to portray some more abstract qualities - should be fun!  I've also, when working through Chapter 10 and the various book structures I've been trying out, tried to portray the sea and the beach in general.

4.10.9 A beach-inspired sketchbook, bound using coptic stitch, which will enable it to lie flat.


4.10.10
A small pocket sized sketchbook, filled with pastel paper separated by tracing paper to mimise smudging.  Each folded pamphlet is stitched by hand and the pamphlets are joined by threading a machine embroidered ribbon through the stitches on the spines.  The ribbon was then glued down to the covers.  This idea could be developed further.


4.11.S1
Fabric shapes trapped between adhesive soluble fabric on back and transparent soluble fabric on the front.  Machine stitched and then soluble fabric dissolved in warm water.  This is one of my samples from Summer School.


4.11.S2
Another sample from Summer School.  We used "gloop", made from 10% PVA and 90% cellulose.  This was painted on a sheet of plastic before threads and  pieces of fabric were laid down (making sure they all linked) and secured by more gloop.  Once dry, the pieces had adhered to each other and could be peeled off as a new lacy fabric.  I thought mine looked like sea creatures, perhaps jellyfish.  I had some stiff paper which I had coloured in sea colours.  I glued on strips of coloured tissue paper using transparent blue Mod Podge, which I also used to give a top coat.  This, I have found, gives an almost leather-like texture to the paper.  I intend to use this piece as a book cover.


These are very early days.  I will have lots more samples to make and also lots of different book structures to explore.  However, as part of my resolution to devote more time to my Distant Stitch work and to work and post regularly, I wished to record my progress so far.  I feel as though I have taken the first tentative step on a really exciting journey!  

Monday 20 June 2016

Certificate Module 4 Chapter 10 (Part 1)

I thought, although I haven't yet finished this chapter, I'd better post my work so far since we'll soon be heading south for a holiday and the Summer School.

I had completely stalled with Chapters 8 and 9.  I wasn't happy with my colours, I was bored with the work, and it seemed that no amount of will power could get me going again.  So I decided to leave those chapters for the moment and re-visit them later and to continue with Chapter 10.

What a difference that made!  I decided to brighten my colour scheme somewhat and was really looking forward to making book structures.  Chapter 10 seems to have finally cast off all my winter gloom and let the sun into my life again.  I loved, loved, loved making these book structures!  In fact, I found it hard to stop, working on till late at night (through enthusiasm, not pressure).  This was FUN!

4.10.0  My little library of hand-made books


4.10.1  A simple pamphlet


4.10.2  A pamphlet construction with pages of varying sizes.  I used dyed tracing paper so that each one would affect the colour of the one on top.


4.10.3  Two pamphlets set in a longer cover


4.10.4  Four bundles of paper set in covers stitched in zigzag fashion using Japanese Stab Stitch


4.10.5  Three bundles of paper set in covers stitched as in 10.5 above, but with covers of different sizes


4.10.6  Two pamphlets stitched into a longer cover folded in zigzag fashion


4.10.7   Five signatures stitched into the spine of a cover.  Fabric was glued to the inside cover to support the stitching and for decorative effect.


I was in paradise all weekend and for once I didn't mind the amount of football on TV as I was engrossed in making books.  I particularly liked the last one, book 7 as it seemed to me like a "real" book.  Up to now, my books were just samples, more decorative than functional.  However I decided to make myself a real, functional book.  With Summer School coming up soon, I thought a small sketch book would be useful.  The pictures of it are below.  (There are lots of pictures, I apologise in advance, but I'm so proud of my baby I couldn't resist sharing them.)

4.10.8a  My finished sketchbook

4.10.8b - the spine

4.10.8c  lots of space for drawing

4.10.8d  the outside cover


This weekend was a very intensive and enjoyable two days.  While working on the books, I found that repetitive, time consuming cutting and stitching gave my mind the opportunity to roam free.  This chapter, as well as revitalising my enthusiasm, has started me thinking of the subject of my embroidered panel and I have the germ of an idea in my head.  I think that reaching this stage will enable me to make best use of my tutorial with Sian at this year's Summer School - I can't wait ...

Thursday 16 June 2016

Certificate Module 4 Chapter 8: Stitchery Into Paper


I seem to have taken an age with this chapter.  Family visits and other enjoyable, but time-consuming activities seem to have got in the way.  When you have a pause it is so difficult to pick up the reins again and I'm beginning to feel I have stalled at this point.


One of the problems was that I was finding my colour scheme rather dull and uninteresting and I couldn't get enthusiastic about it at all.  However, a visit to the seaside, with my usual beachcombing, made me think that the colours of my finds were very similar to my colour scheme, but ones that did appeal to me.  My little collection of shells, stones and driftwood gave me fresh interest in my colour scheme.


WP_20160415_18_54_50_Pro

4.8.1 My collection from the beach


Here was my cream, beige, blue and brown, but with the spark of a lovely ochre colour.  I invested in a few new threads to liven up my colour scheme.


WP_20160420_09_34_43_Pro

4.8.2 My revitalised colour scheme.


I was now ready to start stitching into paper.  In many of my samples, I've worked on Chapter 9 at the same time, incorporating borders with my stitching.


WP_20160613_15_47_08_Pro

4.8.2 Polyester fabric with a grid burned with a soldering iron with blue paper pulp spooned on at random.  At the top a series of parallel lines of long straight stitches formed the base for letter shapes in needle weaving.  At the bottom a letter "S" filled with cross stitches worked at random.


WP_20160613_15_47_15_Pro


4.8.3  In a previous chapter I'd played around with a virtual drawn thread grid.  I printed this onto my hand-made paper (backed with ironed on Vilene to strengthen it).  I then machine stitched on top of the virtual grid.  Spot the deliberate mistake:  I was so intent on getting my stitching accurate (and avoiding stitching into my fingers!) that I missed out a crucial "r" so that it spells "dawn thread work" instead of "drawn thread work".  However, it conjures up an image of the dedicated embroidery sewing away industriously at the crack of dawn so I rather like it!  I worked a hand-stitched border around the edge with buttonhole stitched loops.


WP_20160613_15_46_58_Pro

4.8.4  An evenweave grid bonded to a sheet of hand-made paper.  It has a virtual grid with virtual herringbone stitch printed on top.  I wasn't sure if my printer would survive putting the hand made paper with bonded fabric through it, but it printed as sweetly as ever.  I then stitched a copy of the virtual stitching in machine zig-zag.  I like how the real stitching is just a pale imitation of the virtual stitching.


WP_20160613_15_46_22_Pro

4.8.5  Some dyed scrim with threads withdrawn was given a frame of paper pulp.  Machine stitching was then worked in letter-type shapes on the bars remaining.


WP_20160613_15_46_36_Pro

4.5.6  a  close up of above


WP_20160616_14_00_23_Pro

4.8.7 Triple piece


WP_20160616_14_00_41_Pro

4.8.8 Top of triple piece.  I used a piece of hand-made paper from an earlier chapter which already had the letters S T A in a contrasting paper.  I outlines each letter shape with back stitch and then filled the letter using a different stitch for each letter.  I worked a threaded chain stitch around the border of the paper, which I attached to a piece of dyed cotton fabric.


WP_20160616_14_00_46_Pro

4.8.9 Centre of triple piece.  I put a piece of hand-made paper into the sewing machine, with no thread, and stitched around the letter shapes.  I then used the resulting perforations to carefully tear out the letter shapes.  I applied them to the brown cotton fabric and laid a piece of square-mesh netting on top.  I stitched around the letter shapes with blue cross-stitch.  It looked disappointingly plain and dull and so I stitched a different filling stitch in each shape.  This shape had a border of couched down string.


WP_20160616_14_00_53_Pro

4.8.10 Bottom of triple piece.  The paper with the voided letters was applied to the brown cotton.  Each letter shape had a grid of straight stitches and then each was filled with drawn threadwork stitches.  Each letter shape was outlined with running stitch in a white thread.  The border was stitched twice with blanket stitch, first in an ochre colour and then in a smaller stitch in blue.  An awkward empty space at the bottom was filled with the word "stationery" in double running stitch in fine thread.


Because I had worked in little dribs and drabs in between being very busy, I thought that I hadn't done much work on this chapter.  I was pleasantly surprised, when I drew it all together to photograph it and post it on my blog, to find that I'd done more than I had realised.  There are still some pieces from Chapter 7 that I'd like to do something with, but I seem to have hit a brick wall as far as ideas are concerned and so I think I'll give it a break for now.  It could be that, when I explore ideas for my embroidered panel, that more will occur to me and I'll re-visit this chapter and chapter 9.  In the meantime, I've got a book on book-making and a small book-binding kit to start me off and I can't wait to get going with Chapter 10.

Certificate Module 4 Chapter 7: Applying paper pulp to a woven fabric grid


It's been a while since I posted on my blog, so long that I forgot that, although I'd done the work for this chapter, I hadn't yet photographed it or posted it on my blog, thinking I would wait until I had done the next chapter too.  By the time I realised my mistake, I'd already started stitching into some of the pieces and so here I'll post only the pieces that haven't been stitched and the rest can be seen when I post Chapters 8 and 9. 

This chapter was messy, but fun.  Having tidied out my filing cabinet, I had an abundant supply of shredded paper as a base for my paper pulp making.  I made two basins of pulp, one brown, coloured with walnut ink, and one blue, coloured with Dylon cold water dye.

For my first piece, I tried an idea which had been in my head for a while.  I had an old frame, about 35 cm square.  I bound it with string and simply spooned on pulp from both basins.  Some dripped through to the back but some remained on the surface.

WP_20160616_14_13_11_Pro
4.7.1 One side of the large bound frame piece

WP_20160616_14_13_46_Pro

4.7.2  the other side of the large bound frame piece

WP_20160616_14_14_07_Pro
4.7.3 a close-up view of the layers

I was (and am) quite excited by this piece.  I've given some thought as to how it could be developed through stitching, but haven't yet come to any conclusion.  I'll wait until just the right idea occurs to me.  It would be easier to work it if I cut it off the frame, but I like how the different layers have formed.  Hmmm ...

I also tried making a grid from wire and dipping it in the pulp.

WP_20160616_14_22_11_Pro
4.7.4  Wire grid dipped in pulp - first side

WP_20160413_11_59_58_Pro
4.7.5 Wire grid dipped in pulp - second side


WP_20160616_14_19_51_Pro
4.7.6 A variety of different fabric grids dipped in paper pulp
Clockwise from top left: nylon fabric with a grid of holes burned with a soldering iron, soft metallic mesh, vegetable net, wire grid, plastic canvas, nylon fabric with holes burned, evenweave fabric with some threads withdrawn, vegetable net, blade for a file.