Module 5 "Touching Texture"

Module 5: "Touching Texture"

A study based on textured surfaces in landscape.

Friday 7 December 2012

Certificate Module 2 Chapter 12 progress report

I feel I am making a little progress in this project and am inching towards completion, hopefully by Christmas!  I had an idea, inspired by the beautiful pictures of antique kimonos that Sian posted on her blog www.stitchloop.blogspot.co.uk, that I could use print and stitch to make virtual patches on one piece of cloth.  The print and stitch altered the colour and texture of the fabric sufficiently to look like a patch had been applied.

2.12.7dec 1 Virtual Patches
I had mixed acrylic paint with an extender and fabric medium.  Some was left over so I had fun printing another two samples to use it up (2.12.7dec 2 and 2.12.7dec 3).

2.12./7dec 2
2.12.7dec 3
I also made a sample weaving strips of fabric.  I used lightweight iron-on interfacing as a base, pinned sticky side up onto an ironing board.  I pinned the warp strips at the top and wove the weft strips in, anchoring them with pins at each side.  When finished I pinned the warp strips at the bottom too.  I covered the whole thing with non-stick baking parchment then ironed it lightly before removing all pins and ironing thoroughly.  I then tried a quick version of sashiko by machine stitching parallel lines in white.  I made the stitching diagonal to contrast with the squares produced by the weaving.  See 2.12.7dec 4.

2.12.7dec 4
I could have gone on playing with samples for long enough, but I thought it was time I turned my attention to the construction of the kimono.  I taped sheets of newspaper together and used them to cut out pattern pieces.  I made a sample kimono of plain dark blue cotton to try out the pattern and also so that I could pin various patchwork blocks on to see the effect.  This plain kimono might make a lining for the finished article.  (There is always the intriguing thought that the plain lining would make the kimono reversible from a patterned garment with a plain lining to a plain garment with a patterned lining. 
2.12.7dec 5 plain kimono
Using the paper pattern, I laid out some dyed and stitched fabric pieces to make up the extension to the left front.  (This allows the overlap at the front.)  2.12.7dec 6 shows it laid on the floor alongside the left front.

2.12.7dec 6
Next, I pinned some finished pieces onto the plain kimono and photographed them.  They are not all completely in focus, sorry, but the small size of my studio and the large size of the kimono make it hard to get far enough away to photograph it clearly.  I hope it is enough to give an idea of what it will look like.  (When finished, I hope to borrow my photographer niece's studio.)

2.12.7dec. 7


2.12.7dec 7 trying to get far enough away from the mirror!


Saturday 17 November 2012

Module 2 Chapter 12 Interim Progress Report

I've been working away on my ideas for my kimono but thought it would be a good idea to post something, if only to crystalise my thinking and see how I am progressing.

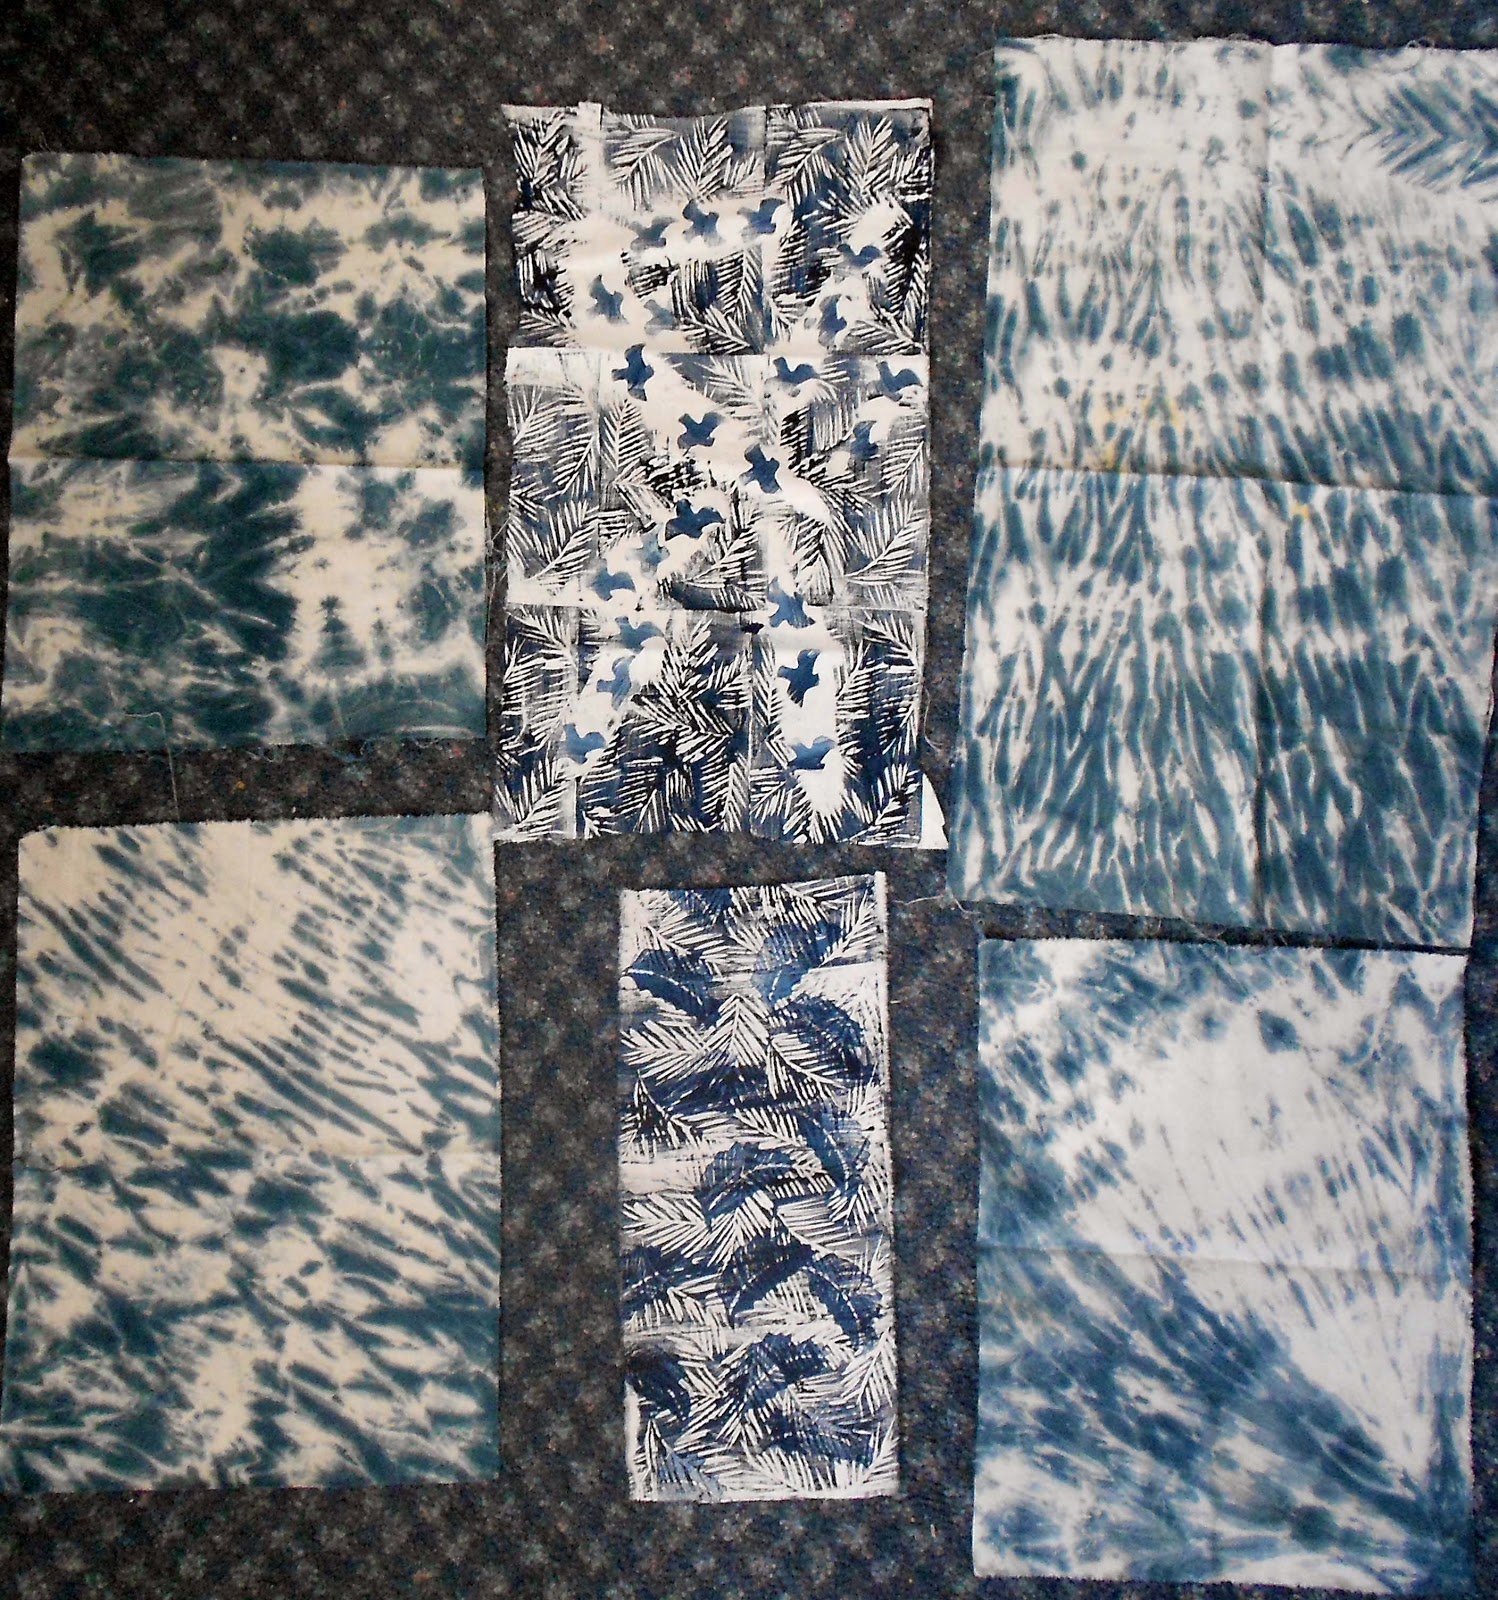
First I got together all my fabrics: the printed ones I'd done recently and the shibori dyed ones from chapter 6.  I laid them all out on the carpet and sorted them out by tone into light, medium light, medium dark and dark, half-closing my eyes and squinting to try to judge the tone.


2.12.F1 Light fabrics

2.12.F2 medium light fabrics

2.12.F3 medium dark fabrics

2.12.F4 dark fabrics

Next I tried piecing some of them to see how they looked together.  Seminole patchwork was one of my favourites when working on piecing in an earlier chapter so I started with that.

2.12.P1 seminole block

I am not so keen on the regularity of pieced patchwork blocks, so I tried laying out some of the fabric pieces in a more random way.  This reminded me of a book I had bought on impulse a couple of years ago on the Japanese technique of Sashiko stitching.  (Sashiko by Mary Parker, Search Press 2002)  In it, I read that Sashiko had originated as a technique used by Japanese peasants to strengthen fabrics worn thin with use and to anchor patches on places which had worn through.  This was done with parallel rows of running stitch.  Later, the technique evolved into a purely decorative one, still based on running stitch, but arranged so as to make repeated patterns, all of which had a meaning and symbolism.  Mary Parker had a dictionary of traditional Sashiko patterns at the back of her book. 

Although Mary Parker had adapted the technique for machine stitching, something about the original hand running stitch appealed to me, and so I tried two of the patterns.
2.12.S1 chidori or plover
The above pattern, 2.12.S1, symbolized autumn.  It is a stylised representation of a sea bird found in Japan.  It appealed to me because it reminded me of the stylised bird shape I used in Module 1.

2.12.S2 Asanoha or hemp leaf
The above pattern, 2.12.S2, is one of the most popular of all sashiko designs.  It is based on the hemp leaf and has strong associations with Buddhism, early paintings often showing Buddha clothed in fabric patterned with an asanoha design.  It symbolised winter and was often worn to express a wish that the wearer would survive the winter, as the perennial hemp plant did.  In modern Japan, this design is often sewn on baby clothes, conveying the wish that the child would grown as vigorously and strongly as the hemp plant.

The symbolism of the patterns appealed to me very much and thought I would try to devise a few Sashiko type patterns of my own which would hold my own personal symbolism.

2.12.S3 feathers like scales
The above pattern, 2.12.S3 came from a drawing of how feathers were arranged on a bird.  It makes me think that one feather on its own could not do much, but all the feathers laid together function to keep the bird warm and enable it to fly.   For me, then, this pattern symbolises working together with others.

2.12.S4 downy feathers
The above sample, 2.12.S4, reminded me of a much-loved goose down duvet which is a great comfort in the winter and so, for me, this Sashiko design symbolises warmth and comfort.

2.12.S5 wing

The sample above, 2.12.S5 came from a drawing of the wing of a swallow.   The flight of the swallow is so joyful and free that this Sashiko pattern, for me, symbolises freedom and joy.

I also intend to stitch some Sashiko patterns which have secret symbolism and meaning for me, and to put them in hidden places on my kimono, inside a sleeve or a hidden part of the lining, so that only I know that they are there.

As well as being interested in the decorative and symbolic use of Sashiko, I was also attracted to the original, utilitarian use and thought it would be ideal to join together my randomly pieced fabrics.  I laid out a selection on the floor, so as to make a piece large enough to make one front of the kimono and started stitching it by hand with running stitch.  So far I have spent 12 hours on it with quite a few still to go, so this will be a nice, relaxing, on-going part of the project, ideal for stitching in front of the telly!  I thought the repetitious stitching would be very tedious, but I am enjoying the rhythm of it and I love the effect.  The patterns on the fabrics still show through it, but it blends the different pieces in a delightful way and I like the pin-striped effect.  Because of the size I have found it hard to photograph this piece, but I have tried to show one overall picture and a few close-ups as shown below.


2.12.K1 left front of kimono
2.12.K2 first detail of left front

2.12.K3 second detail of left front

2.12.K4 third detail of left front


2.12.K5 fourth detail of left front

While researching Sashiko on the internet, I came across a reference to another Japanese technique, Sakiori.  This is recycling strips of fabric by weaving them into a new fabric.  It is usually done on a loom with thread as the warp and strips of fabric as the weft.  I decided to try the concept, but weaving strips of cloth for both warp and weft.  I have only just begun, by pinning the strips onto an old ironing board, but so far I like the effect.  Something to experiment with perhaps.

I am still puzzling as to how to use my fabrics for the other partse of the kimono.  It would take too long to do the whole garment by the technique used for the left front, and besides, I want to showcase different techniques in the garment.  I have had a try on Photoshop with some thoughts, shown below, but I feel that my ideas will evolve as I piece more blocks.

2.12.W1 woven fabric strips
2.12.K6 idea for kimono front
2.12.K7 idea for kimono back


Thursday 25 October 2012

Certificate Module 2 Chapter 12 (ongoing) - some more printed fabrics

I thought I needed some more fabrics for a large object like a kimono.  I also wanted to make some of the patterns reflect something about Nanki-Poo in The Mikado.  So I revisited some earlier chapters of the module, doing some drawings of birds, feathers and wings and using them to make some print blocks and some monoprints.  By chance, I attended a weekend drawing workshop led by the brilliant Jane Milloy (worth checking her beautiful website www.janemilloy.co.uk) and did a detailed drawing of feathers along with some other drawings of birds and animals.  These drawings made me really look at the subject, which helped me when I then tried to abstract some patterns from them.

2.12.drawing 1 - detailed feather drawing


2.12.drawing 2 - duck swimming - tonal exercise


2.12.drawing 3 - quick sketch of 3 ducks


2.12.drawing 4 - wildcat - using marks to indicate texture


2.12.print 1 - a selection of prints from print blocks I made based on drawings


2.12. print 2 - monoprints


In all the prints, both using print blocks and monoprints, I used acrylic paint mixed with a little retard gel to keep it from drying up too soon and some fabric painting medium since I wanted it to make a garment which would be washable.  I had deliberately kept my shibori fabrics from chapter 6 for my 3D functional object.  Although I had used a black dye and mixed it twice as strong as the instructions said, the result was an indigo colour rather than black.  I rather liked this colour and Sian said I could just make the indigo my black.  Accordingly, for the printed samples, I mixed monestial blue (phthalocyanine) acrylic paint with a little mars black to give an indigo colour.  The blocks I used were mostly funky foam cut out to a shape and textured with a ballpoint pen before being glued to a sturdy backing.  I also used one lino print.  To use the lino block, I applied paint with a brush before pressing it onto the fabric with hand pressure alone.  However, in a couple of weeks, I will have the use of a printing press through a local artists' society and would like to try to see what results I get with it.

I am quite pleased with the results I have had so far.  From here, I would like to use some plain indigo fabric to stitch some sashiko designs, by both hand and machine, to interpret some of the shapes and textures of my drawings.  Then I should have enough fabric to start creating some pieced blocks, using the techniques I explored in the samples, before trying out various placements of the blocks on the kimono.

My main recent problem has been lack of time, with various family duties pressing heavily on me.  However, I am feeling optimistic that, during a few exceptionally busy weeks, I have still managed to do some work which I have enjoyed and with which I am reasonably satisfied.  I am now becoming excited as the finished kimono is beginning to seem (for the first time) real and achievable.


Thursday 4 October 2012

Certificate Module 2 Chapter 12 First Thoughts

First I had fun making some 3D shapes out of felt, stuffed with toy stuffing.  (My niece is about to have a baby - 4 days overdue and counting - and I thought these could make nice toys later.)


For my functional 3D object, I would like to make a kimono.  All the time I was working on the pieced samples, I found myself humming the tune of " A wandering minstrel I, a thing of shreds and patches ..." from Gilbert and Sullivan's operetta The Mikado.  Since some of the techniques we used were Japanese and since some of my samples had a distinctly Japanese theme, it seemed an appropriate choice. 

The kimono will be a stage costume for Nanki-Poo in the operetta.  It has been interesting to do some research into traditional Japanese men's clothing.  In traditional Japanese dress, the patterns, fabrics and placements of designs on clothing could convey subtle messages about the status and character of the wearer.  Although it would take a lifetime's study to understand these messages, I thought it would be interesting to try to convey something of Nanki-Poo's status and character through the surface design of the kimono. 

Although the son of the Mikado and thus a person of very high status, he is disguised as a poor travelling minstrel.  As well as the song "A wandering minstrel I ..." another song he sings is about a bird, a "little tom tit".  In this song, he tries to gain the sympathies of his lady love by singing to her of a bird that died for love.  This also pokes fun at the culture of over-sentimentality which was prevalent in Victorian Britain at the time.

Being a rather large object, the kimono will require more fabric than I have left, so I intend to dye and print more fabrics.  The samples I have done so far in this module have made me realise that the range of my design source is rather limited.  Accordingly, I have begun to gather more research by drawing birds and feathers to tie in with Nanki-Poo's second song.  These will bring some fresh patterns to my dyeing and printing.

I have recorded my thoughts so far in three design sheets.  The first contains the inspiration for my kimono.


The second contains details of the construction of the kimono and a diagram of the pattern I'll use.  This is from an excellent book Creative Dressing by Kaori O'Connor (Routledge and Kegan Paul Ltd, 1980).


The third contains some thoughts on placement of the patterns.  I played around with various ways of showing the designs as well as exploring a few different pattern placements.  This stage could have gone on for some time, but I limited myself, since the new fabrics I'll prepare will, to a certain extent, dictate the patterns and their placement.  Once I have prepared some more fabrics, I'll try this exercise again.


Finally, although I've only just started, here is a composite picture of some drawings I did of birds I had photographed in my garden and a feather I picked up.

Friday 7 September 2012

Certificate Module 2 Chapter 11

I really loved this chapter.  It brought together many of the things we'd done in earlier chapters.  I really enjoyed co-ordinating the machine stitching with the decorated fabrics.  Once I had got the right idea of Chapter 10, repeating the cutting and piecing with the decorated fabrics was fascinating and fun.  For some reason, I lost my usual enthusiasm for much of this Module, but now I seem to have it back and am raring to go!

I started with the paper exercises.


2.11.p1
2.11.p2


2.11.p3
2.11.p4
2.11.p5
2.11.p6
2.11.p7
2.11.p8
Next I used machine stitching to decorate some of the fabrics which I patterned in a previous chapter using monoprint, bleach and various methods of tie dye.  This was fun even though I did break 3 machine needles and even a wooden frame!

2.11.st 1
2.11.st 2a (on left) and 2.11.st 2b (on right)
2.11.st 3
2.11.st 4a (left) 2.11.st 4b (centre) and 2.11.st 4c (right)
2.11.st 5a (top) and 2.11.st 5b (bottom)
2.11.st 6
2.11.st 7
2.11.st 8
2.11.st 9
2.11.st 10
2.11.st 11
2.11.st 12

Finally I went on to use these to make stitched fabric samples.

Stage A

Sample 1 was a simple, fairly symmetrical one, just to practise and get my eye in.  I started with the "stack and whack" method mentioned in the course notes.


2.11.sample 1 smooth side
2.11.sample 1 rough side

In my second sample, I joined all the equilateral (nearly) triangle shapes left over from the "stack and whack" to make what was meant to be a hexagon but actually had 7 pieces instead of 6.  While considering what to do next with it, my eye was caught by some trimmings lying about on the floor, so I stitched them around the edge of the heptagon so they could radiate out from it.  It made me think of some sort of sea creature, an octopus or a jellyfish, so I sewed a loop on the centre so it could dangle.  I have photographed it both ways.

2.11.sample 2 radiating
2.11.sample 2 dangling
In sample 3 I tried to incorporate  some interesting decorative seams.  These are evident in the first piecing, although they progressively disappear with subsequent cutting and re-joining.


2.11.sample 3 first piecing


2.11.sample 3 second piecing
2.11.sample 3 third piecing (smooth side)
2.11.sample 3 third piecing (rough side)
In sample 4, with the repeated cutting and piecing it was eventually too thick to seam again, so I butted the seams for the last piecing and used a wide machine stitch to make a faggoted seam.


2.11.sample 4 (side 1)

2.11.sample 4 (side 2)
 Stage B

I started by making one large sample.

2.11.B1
This I then divided into three using the Fibonnacci Series proportions.  The first piece I left as it was, the second piece I cut and re-joined once more and the third piece I cut and re-joined twice more.  I then re-assembled the three sections.

2.11.B2 (side 1)
2.11.B2 (side 2)